
Setting up a studio at home? In today’s world, with all the never-ending progress in technology, establishing yourself as a producer or musician on out of your own home is entirely possible. Today, we take a look at 60 Tips for the Best Home Music Production to make all your studio outputs that much better.
 This guide aims to give you many worthwhile tips on how to set up a music studio at home. We also take a look at creating the ideal monitoring and recording environment. By the end, you should have picked up several tips on how to create a really functional studio environment for your workflow. Let’s begin…
60 Tips for the Best Home Music Production
1. Budget for Acoustic Treatment
Starting off our tips for the best home music production, let’s talk acoustic treatment. When starting out, most newbies would readily evade acoustic treatment. Diving into your studio mixes and recordings seems to be the most exciting thing you’d rather give attention to. But to produce the optimum music in your studio, before making any major purchases, be sure to acoustic treatment into your budget. This will have a truly significant impact on your overall music quality. Have a look at the following for more:
- How to Set Up Acoustic Treatment in your Home Music Studio
- Best Products for Studio Acoustic Treatment
2. Don’t Worry About High-End Gear
If your wallet allows it, then by all means splurge. But it is also entirely true that you can make decent studio recordings and mixes without breaking your bank account. Of course, as time progresses you may want to invest in the kind of gear the pros use. But don’t let price tags hinder you from simply starting out with your music productions.
3. Avoid Skimping out on Studio Monitors
When thinking about how to set up a music studio, having a good set of studio monitors in tow is a major component. Studio monitors provide the benefits great precision in terms of perception when working with your mixes. They also lay bare all the true details of your song, allowing you to correct and enhance with ease.
4. Isolate Your Studio Monitors
When your monitor speakers project sound, the body of the speaker also resonates. While it is ideal to treat your studio, you also need to ensure your monitors are not sitting directly against your studio walls. In addition, ensure that you decouple them using desktop pads or desktop stands if they’ll be placed on table. You could also consider using monitor stands. For more check out:
5. Ensure That Your Music is Portable
This is a major aspect when it comes to tips for the best home music production. Having a portable mix means that your music can be heard with the same consistency irrespective of where you listen to it. Whether you listen from the studio, car radio, out of your headphones or out at the club, the standard of your audio quality should remain excellent. For more about how this is achieved check out this article on Are Monitors Better than Headphones for Mixing?
6. Use Closed-Back Headphones for Audio Tracking
This is another key aspect for tips for the best home music production. Closed back headphones provide the benefit of not allowing sounds to escape the headphones and enter the microphone you are using to record. This allows for absolutely clean recording quality. These can also be used for monitoring. A great example of these would be the Beyerdynamic DT770 Pro Headphones. Check out the review here.
7. Use Open-Back Headphones for Mixing/Monitoring
Closed-back headphones prevent sounds from escaping while also canceling external noise. Open-back headphones, however, are more suitable for longer periods of use like mixing/monitoring, but not recording as sounds can be picked up by the mic. Since they are not closed, they allow more ambient noise to be perceived, if this is your preference for mixes.
8. Soundproof Your Studio
Soundproofing provides the two-way benefit of preventing sounds from your escaping your studio and affecting neighbors. It also helps with keeping unwanted external sounds from entering your studio and tainting your recordings. Two great articles to check out in this regard are
- Soundproofing Your Music Studio on a Budget
- Having an Apartment Music Studio Without Annoying your Neighbors
9. Make Use of Sound Diffusers
Diffusers reduce the sterile feel to a room that is created after using absorption to deaden sound reflections. Diffusion functions by dispersing some of the traveling resonances back into the room to add liveliness. They also eliminate aberrations like echoes in your studio.
10. Add Bass Traps
Another one of the tips for the best home music production is the addition of bass traps. Bass traps serve the purpose of absorbing lower range frequencies emitted by sound sources in your home studio.
11. Make use of Acoustic Panels
This is completely essential when it comes to tips for the best home music production. Acoustic panels come in the form of either foam or fiberglass. These absorptive panels function by absorbing mid to high range frequencies in a studio. They eliminate the general surplus of reflections otherwise not managed by bass traps and diffusers.
12. Record at 24-bit
Recording your studio tracks at 24-bit depth is advantageous for your audio quality. Higher bit depths have the benefit of capturing the finer more intricate facets of your recordings, as well as a greater dynamic range.
13. Consider the Sample Rate
The standard in terms of sample rates is 44.1kHz or 48kHz. Newer audio interfaces offer rates up to 96kHz and 192kHz.This is worth a mention in our list of tips for the best home music production as many music producers dabble with higher sample rates in their productions.
While you could simply stick to the standard when starting out, there is no harm in experimenting higher rates. Bearing in mind that this could equate to a larger file size.

 14. Audio Interfaces are Essential

Audio Interfaces are essential to all music studios. On our list of tips for the best home music production, this is really one of those you can’t overlook. Audio interfaces serve as a connection point between your computer, and all your recording inputs, such as mics and instruments. Learn more about Audio Interfaces in detail here.
15. Don’t Only Correct Audio During the Mixing Process
When it comes to studio recordings, you want to ensure that you have the best quality you can achieve right from the beginning. It’s easy to fall into thinking that you can just rectify imperfections afterward. While this is true to some extent, ensure you’ve used pop filters, acoustic treatment, correct recording settings etc. prior to mixing. This is so you don’t have unnecessarily more to rectify after the fact.
16. Use Pop Filters
With reference to our last point, the use of pop filters will ensure top quality in terms of vocals. Pop filters prevent the impact of plosive sounds (such as P’s and B’s). Pop filters eradicate issues of sonic clarity that you would otherwise have to edit out digitally.
- Have a look at this article on The Best Pop Filters for Home Music Studios. They’re really cheap and worth the spend.
- Alternatively, if you really want to DIY it, have a look at ways to make your own pop filter at home.
17. Consider Microphone Isolation Shields
To take it a step further with optimal quality when it comes vocal recordings, Microphone Isolation Shields come into play significantly. It’s not a must, but if you’re recording with a live band, an isolation shield comes in handy to block the additional sound. Other unwanted external noises are also eliminated this way, especially if your microphone is highly sensitive. A great example of this would be the Monoprice Microphone Isolation Shield. Check out the product review here.
18. Find the Right DAW for You
In all probability, you already have a DAW Software. But in the case that you don’t, it’s a great idea to really look at the specs and components that would be suitable for what you’re aiming to do in your studio. Have a look at this article on the Best DAW Software for Home Music Studio Production.
19. Avoid Overlapping Studio Tasks
To ensure a higher quality output, try as far as possible to allocate different times to different tasks. While some producers make quick mixes during the recording process to hear how it will sound. Rather avoid making your main mixes while recording. Don’t compose while recording. And don’t attempt to master while mixing for example. Perform each task on its own day, with a clear mind and perspective.
20. Keep Your Mixes Simple
It is really ideal to avoid over embellishing your mixes. New music producers often tend to get excited and want to implement as much as they can. In a lot of cases, less is more when it comes to studio mixes. Adding too many elements can easily make a mess of things.
21. Color Code Your Tracks
Another one of our tips for the best home music production is pretty standard amongst music producers. For the sake of productivity, organizing the various tracks of your mix according to color groups helps to keep everything neat and tidy. Tracks are easier to find this way, and you save yourself much time and hassle in the long run.
22. Find The Ideal Microphone Combination for your Studio
Microphones in a music studio perform a variety of functions. While you could go for a single dynamic microphone when starting out, you may later consider adding to your collection. The microphones you use would be specific to the type of instruments you’re recording, or to your vocalist. Have a good look at what various microphones there are and how they could benefit you. For more, check out the article Do I Need Different Types of Microphones for my Studio?
23. Dynamic Microphones
These microphones are on the stronger end things in terms of what they can withstand. Dynamic mics are typically considered more robust, and can withstand greater sound pressures. While dynamic mics are considered great for universal use, you may want to look into them specifically for recording drums, or live stage recordings etc.
24. Condenser Microphones
More commonly found in music studio environments are condenser microphones. This is specifically in the case of vocals. Condenser mics are much more sensitive to sound than their dynamic counterparts. They’re also typically a litter pricier in comparison. Condenser microphones capture greater clarity and detail due to their sensitivity. One of our tips for the best home music production is to try, as far as possible, to use a condenser mic for vocals.
25. Ribbon Microphones
Ribbon microphones share very similar qualities to condenser microphones. The major defining factor here is that they are significantly more sensitive than condenser mics. As a result, you’re able to record the entire ambiance of a room. These are typically much heftier in cost, but worth consideration for the capture of studio and live sound.
26. Try USB Microphones for Cost Effectiveness
Over the years USB Microphones have steadily become popular in the home music production space. One of the main reasons for this that the USB mics tend to be on the more affordable end of things. However, USB mics do vary in terms of quality. A great USB mic to check out is Rode NT-USB Condenser Microphone on Amazon.

- Have a look at the full review of the Rode NT-USB microphone here.
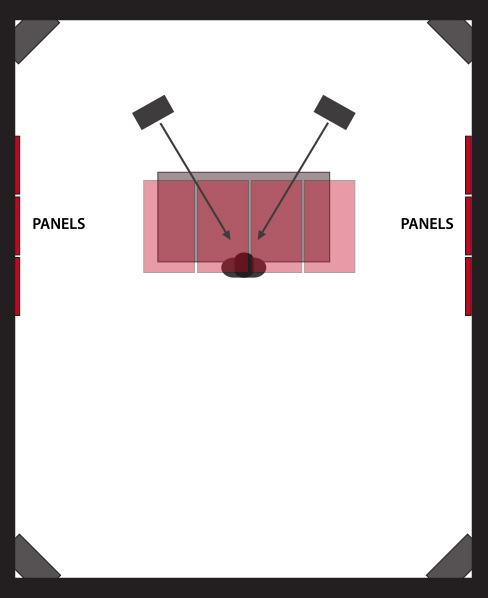
27. Try Adding an Absorptive Floor and/or Ceiling
While adding treatment to your studio walls is highly beneficial, also consider your floors and ceilings. You don’t have to go too far out of your way to do this, but installing wooden flooring for absorption does the trick. As for the ceiling, consider adding panels right above your mixing station as illustrated below. Additional sound reflections are eradicated in this way.
28. Remove Excess Resonances in Your DAW
As previously mentioned, the best way to work things is to get rid of additional reflections primarily, by using acoustic treatment. Secondly, you’d using pop filters/microphone shields. Whatever remains in terms of imperfections to your audio would be corrected in your DAW software upon mixing. Learn more about this in 11 Tips For Professional Sounding Vocals in Your Studio
29. Ensure that You Use Compression For Vocals
Compression is absolutely key to producing professional vocals in the studio. Compression serves the purpose of managing the major highs of your track. It also ensures the production of cleaner understandable vocals. The other major advantage of using compression is the production of dynamically consistent vocals. Basically, this means producing consistency such that the listener doesn’t have to keep readjusting the volume as the singer performs softer or louder.
30. Remember to Liven Up the Recorded Track
Another one of the best tips for home music production is to eliminate the sterile feel and deadness to your track. Recording in an acoustically treated environment, and also digitally removing additional resonances as well as applying compression has the impact of overall dryness to the sound.
Adding life and color to the song becomes important as a result. Include elements such as saturation. Also, add depth by using reverb. You could consider delays as an alternative to reverb. Also, consider thickening the vocals for a fuller effect. You achieve this by recording the track a few times and then combining them. Alternatively, you duplicate the track where necessary.
31. Consider the Monitor Placement for Smaller Studios
In a lot of cases, starting out as a music producer means working out of a smaller bedroom studio. Using a confined space as a studio can be a little tougher as sound reflections are significantly rife due to the close range of the walls. As a result, you need to consider the orientation of the monitors. For smaller spaces, place your monitors along the shorter length of the wall, firing down the longer length of the room. Learn more about monitor placement in smaller studios here.

32. Think about Monitor Placement in Larger Dedicated Studios
Similarly, larger dedicated studios also need careful attention in terms of monitor placement. This would be in the case of having an entire garage, basement, attic etc. to use as a studio. Contrary to smaller studios, in larger professional setups, the monitors are placed along the longer wall of the room. The sound fires down the shorter length of the room. Learn more about monitors in larger dedicated studios here.

33. Use Both Headphones and Monitors in Conjunction
For that profession sound, this is another one of our tips for the best home music production. Yes, gathering studio gear can indeed be a pricey exercise. In most cases, if you could only have one over the other, monitors are the ideal. However, in all professional studio environments, both monitor speakers and headphones are used for monitoring.
Monitors give you a great sense of directional and atmospheric sound. They reveal the true flatness and intricate details of your track. Headphones take this a step further by helping you identify finer issues not heard through the monitors.
34. MIDI Controllers are Worth It
MIDI controllers are really powerful tools to have in the studio. What is a MIDI Controller? This is a keyboard device, allowing producers to be more versatile in their studios. MIDI controllers enable you to produce a multiplicity of sounds through your DAW or virtual instrument plugins. The controller does not produce any sound of its own, as a result as the sound is generated through your computer. A great example of this is the Novation Impulse 49 MIDI Controller. Have a look at the detailed review here.
35. Invest in a Keyboard if you’re familiar with Keys
Particularly for smaller spaces, you may not be able to fit an entire piano inside to record live. Keyboards come into play here. Electronic keyboards differ from MIDI Controllers in that it is an instrument on its own. You can record directly into your computer, or perform live with other musicians to record.
36. Electronic Drum Kits are a Great Alternative to Acoustic
We all know and love the traditional acoustic drum set. But they do take up much space, and if your studio environment is not well insulated, they can be problematic when it comes to your neighbors. Electronic drum kits are perfect for smaller apartment spaces and all-around more cost friendly. Have a look at this article on the Alesis Nitro Electronic Drum Kit for a fair example.
37. Stick to Balanced Cabling Where Possible
When it comes to your studio wiring, balanced cables are often preferred as they come with less hassle in terms of preventing noise. Balanced cables have both positive and negative versions of the signal passing through. This combination has the benefit of the overall nullification of noise. Read more about cabling for your home music studio here.
38. Make Unbalanced Cables Work
This is a notable aspect when learning how to make a home music production studio. Despite your effort to try and stick to balanced cables, you may inevitably find yourself having to used unbalanced cables. A lot of high-end studio gear still makes use of unbalanced cables. Unbalanced cables are prone to creating noise which is why people tend to avoid them. To work around this, ensure you use cables with adequate shielding. Also, make sure that the cable isn’t too long. Keep the cable away from power sources as well.
39. Using Carpet as Acoustic Treatment
If you’re temporarily just looking to make experimental tracks, having something rather than nothing is better when it comes to acoustic treatment. Using carpeting for acoustic treatment for the short term should do the trick while you’re still saving up. Ideally, you should go for proper acoustic treatment for your studio.
40. Try Out a DIY Pop Filter as a Temporary Alternative
Pop filters are simple little tools with much impact on the quality of your vocal recordings. When learning how to make professional recordings, a pop filter is necessary. While the ideal situation is simply getting the real deal in terms of pop filters, you can simply try making one at home. Have a look at this article on how to make a DIY Pop filter. They’re not ideal for long-term use, but having some form of covering for your mic is better than nothing.
41. High-End Monitor Specs
Monitors are one the most important tools in your studio. Studio monitors are known to range well into thousands of dollars when it comes to the cost. You often get what you pay for when it comes to audio quality. But you can still get wonderful mixes out of cost-friendly monitors.
Higher end monitors often promise a better performance in terms of balance, smoothness, detail and reliable translation. Check out this guide on the Best Studio Monitors for Home Music Studios.
42. Budget-Friendly Monitor Specs
With reference to the last point, don’t think you can’t still produce something great with cheaper studio monitors. Many superstar music producers started off with what they could simply gain access to. Simply make sure you look out for aspects such as the woofer size of the monitors, and ensure that you have adequate acoustic treatment for better quality. The previously mentioned guide on selecting the monitors for your studio is a great guide in terms of price comparison and features.
43. Avoid the Overuse of Compression
Compression forms a key tool for professional sounding music. It really assists with the generation of distinction and clarity. It creates a dynamic consistency between the softest and loudest part of your audio. Overusing compression, however, can really distort the quality of your sound. So use it wisely.
44. Soundproof Some of Your Studio Gear
Condenser mics are really sensitive and pick up on everything. Some of the gear in your music studio can prove to be a little problematic when it comes to generated noise. When figuring out how to improve your recording quality, you may have to look into soundproofing your PC case. Also, take a look at other noisy elements such as air conditioners in the room. Condenser mics are really sensitive and pick up on everything.
45. Use an Elimination Process to find the Source of Audio Noise
Noises such as crackling or static are very common occurrences in studios. When figuring out how to correct noise from your monitor speakers, a number of factors may be the case. It may not be the monitors in particular that are the problem. Have a look at the device compatibility between your interface, monitors and computer. Ensure your softwares are installed correcty. Check out this detailed article on How to Fix Audio Crackling in Studio Monitors.
46. Get an SPL Meter for your Studio
One of our next Tips for the Best Home Music Production is to check SPL meters. Many newcomers tend to overlook this aspect in terms of what is needed for a home music production studio. An SPL Meter enables you to measure the Sound Pressure Level of the acoustics. An important SPL Level to remember is 85 dB SPL. This is the level at which the human ear is able to flatten its own natural response. While it isn’t necessary for you to constantly monitor your mixes at this level, using 85dB SPL now and again helps you get an even interpretation of your mix down in terms of human hearing.
47. Use a Multilevel Desk for Smaller Spaces
Another one of our tips for the best home music production has to do with, well… furniture. While all the electronic gadgets appear to be the more exciting elements of your studio. The mundane things like desks count. Using a multilevel desk that is meant for mixing can make your life that much easier. These allow for the storage of multiple pieces of equipment without taking up space, yet allowing you a better workflow. Have a look at 15 Best Product for Bedroom Music Studios.
48. Go for Smaller Woofer Monitors for Apartment Studios
Most people won’t have the luxury of working out of a house with enough private space that won’t affect your neighbors. When living in an apartment, think about the impact on those around. Using monitors with a smaller woofer sized monitors means that the significance of resonances won’t be too bad in affecting your neighbors. Remember to decouple/isolate the monitors as mentioned earlier.
49. Manage Volume and Bass Levels for Apartment Studios
When considering how to make a home music production studio, this is another aspect to think about in terms of neighbors. Manage the noise levels. Adequately soundproofing an apartment studio can be a little difficult, if not impossible for some. Find out why in this article on Having an Apartment Studio Without Annoying your Neighbors. Because of this, one of the simplest tips for the best home music production in this case is to simply turn it down. This includes the bass settings on the monitor speakers.
50. Schedule With your Neighbors
This one can prove to be a bit of a pain in the rear end, but it is an essential facet when thinking of how to set up a recording studio in your apartment. Possibly one of our slightly complex tips for the best tips for home music production is dealing with neighbors. Especially if you’re going to be using aspects that are inevitably loud, like an acoustic drum kit. You want to give this some thought. Perhaps inform your neighbors if you’re planning a session. Alternatively, monitor the times of day when most people will be out.
51. Make sure you Have Low Latency Monitoring
There is nothing more aggravating than trying to get your studio work done, but dealing with audio glitches. This specifically refers to lagging audio. When signals enter a computer, it can take a while to process before it leaves the studio again. This delay is known as latency. A good way to work around this is to not only ensure that your computer has fast RAM. But also, most audio interfaces ensure very low, if not zero latency.
Check out the following for detailed tips for the best home music production:
- A Great Guide to Audio Interfaces (featuring recommendations and specs)
- The Best Computers/Laptops for Home Music Studios (recommendations and specs included)
52. Flush Mounting Your Monitors
This is the typical set up for most big professional music studios. It may, however, prove to be difficult to try out in an apartment. Flush mounting entails building a secondary wall into which your monitors are set. These could be built with dry wall, wood, concrete or bricks. The benefit of flush mounting is that it serves as an effective decoupling system. The resonances emitted through the body of the interface are eliminated behind the secondary wall.
53. The Best Hard Drives for Music Production
Managing your storage space is essential when it comes to music production. The more you grow as an artist the more storage you’re going to need. One of the next best tips for home music production is to check out the best hard drive systems for your music storage, as your folders add up over time.
- Go for an external Thunderbolt or Fire storage
- Consider RAID, NAS or Personal Cloud storage
- Solid State Drives (SSD)
54. Managing Cable Clutter in Your Music Studio
The more gadgets that occupy your music studio, the more of a tangled mess you’re likely to be in. The next of our tips for the best home music production is use simple tools to gather your cabling. The are a number of methods your can try out to use keep your cable setup neat. These would include:
- Cable Raceway Duct – Amazon
- Cable Zip Ties – Amazon (for grouping cables together)
- Velcro Reusable Ties – Amazon
Another tip is to plan your cable connections before hand to avoid wire crossing. Also, try to keep the cables away from the power sources to prevent noise. This is especially in the case of unbalanced cables.
55. Designate Your Working Stations
We’ve previously discussed setting up orienting and setting up your studio monitors. This area will basically determine your mixing station. The next aspect to think about in terms of tips for the best home music production is to work out where your various recording stations will be.
For better more productive workflow, you want work out where you’ll locate your mics for vocals. Also think about drums, guitars etc. How do you record your various instrument in an effective setup. Learn more about this in Best Ways to Improve Home Music Studio Productivity.
56. Direct Your Mics Away from Noise Sources
This one is a given. One of simplest tips for the best home music production. When it comes to how to setup a recording studio at home, you want to direct your mics away to whatever noisy elements that may exist. Keep your mics away from aspects like computer towers for example.
57. Use The Presets That Come With Your DAW
One of the really key tips for the best home music production is to not avoid the presets. There’s a bit of stigma surrounding these that suggests that you lack creativity if you implement the presets from your DAW. These are actually really helpful in that they simplify the mixing process a lot. Presets can always be adapted to suit your individual style as an artist. And this is where your uniqueness will always come into play.
58. Be Unique as an Artist
While it is always wonderful to be inspired by your musical heroes, don’t aim to be them. The only way to truly stand out as a music producer is to have your own unique edge that will make you distinctly recognizable to listener.
59. Avoid Doing it All By Yourself
Understandably, many producers want to proudly say that solely they from start to finish produced the music. For the sake of productivity, however, there is absolutely nothing wrong with getting some assistance during your music making process. You should consider getting someone else to master your tracks if it isn’t your forte. Or get some assistance during your recording process with multiple musicians. Reaching out is a good thing.
 60. Network With Other Producers
Another one of our tips for the best home music production is networking. Don’t isolate yourself as a music producer. This is an easy mistake to make when you have a home music studio. Getting feedback from other producers in your field is always a great positive. The Internet is a huge place with scores of forums and communities in which you can interact with other producers.
That’s our 60 tips for the best home music production. If you’re someone starting out or looking to improve your studio/workflow, you can pick a number of aspects to incorporate. Make sure you check out Best Ways to Improve Home Music Studio Productivity to learn how to improve your workflow.