
 So… you’ve splurged on a great set of studio monitors for your home music studio. An awesome investment to make, really. But the conundrum that every newbie is faced with when setting up a studio is, well, where to place all the gear… So, what exactly is the best professional setup for studio monitors at home?
Believe it or not, the arrangement of your physical studio environment can have a real impact on your musical outputs. Just angling your monitors correctly could mean the difference between sonic greatness and mediocrity. Who would’ve thought, right? We’ll dig a little deeper into this today.
In a separate article, we looked at what the ideal setup is for studio monitors in much smaller/bedroom studios. Today, however, in this article, we look at the ideal arrangement in larger, dedicated home music studios. That is, you have the luxury of a whole room, e.g. a garage, basement or attic etc. to use for your creative, musical workflow.
This guide informs about creating the ideal setup for your workflow. It also gives you a 6-step break-down on creating the best professional setup for studio monitors.
Optimizing Your Equipment Arrangement
It’s all good and well to get yourself the most impressive monitors on the market, but are you truthfully getting your money’s worth out of them? But beyond the high-end technical performance of your actual monitor speakers, the set up of your listening environment has more of an effect than you may realize.
Why is Monitor Placement Important?
Monitors are essential to music studios for the purpose of revealing the true nitty-gritty details of the track you’re dealing with. Recording, mixing and monitoring are all processes that require this highly accurate level of perception while monitoring. Trouble is, in any monitoring environment, the room itself also interacts with the listener.

How sound travels in a room
We all know that sound travels in a room, right? As a result, sound reflections also become a factor when monitoring, as sound waves not only move across the room, but also bounce off of reflective surfaces inside it. These additional sounds, known as sound reflections, create a surplus of noises in the room, all of which have an impact on the perception of the listener.
So in a nutshell, to manage this interpretation of sound while monitoring, you not only have to consider the acoustic treatment of the room itself. But equally as important, you have to consider the placement of the monitor speakers in your music studio. While you could have the best of the best monitors, the truest precision in monitoring is achieved by appropriate positioning.
Setting it up: First Things First
Before diving into our six-step guide, let’s learn about type of studio we’re going for. Dedicated home music studios are really advantageous for the fact that, you’re not cramped in a tiny little bedroom. Dedicated music studios can vary in terms of how professional and high-end they are. In typical home music studio setups, you would most likely be using near-field or midfield monitors.
(If you’re working out of a really small bedroom with little space, perhaps have a look at this article instead)
The Best Professional Setup for Studio Monitors
High-end professional studio setups, however, typically make use of monitors that are mounted to the studio wall itself; also referred to as flush-mounted monitors. The monitors used in these pro setups are known as main monitors, or simply referred to as mains. In this guide, we look at this described setup as our model arrangement for your dedicated home music studio.
The Requirements
For this guide, the key requirements you should have on hand for the best professional setup for studio monitors are as follows:
-
- Monitors, naturally. For your larger dedicated home studio, you want to go for studio monitors with a larger 7-inch to 8-inch element. This could be larger if you’re really working a with a much bigger space.
-
- For a flush-mounted monitor setup, you would need to either construct or have a flush-mount wall installed. You can make the construction using a number of different materials such as: concrete or bricks, wood or, alternatively, gypsum board. We’ll delve into the pros and cons of each of these materials a little later.
-
- You need proper acoustic treatment for your studio. This would include elements such as bass traps, acoustic panels and diffusers. (For an in-depth guide setting up acoustic treatment in your studio, check out this article.)
-
- Naturally, the remaining items you’d need are a mixing desk and chair for your mixing station/listening position.
Step 1: Orientation
The position of your mixing station determines your overall listening position when monitoring. Because of this, the position of your mixing station is something to be meticulously thought out. Don’t simply toss your mixing desk wherever you please when establishing the best professional setup for studio monitors.
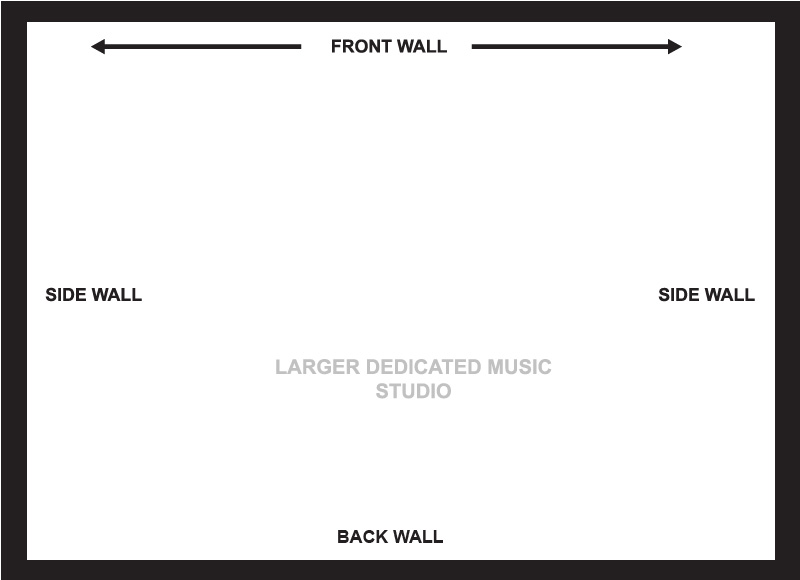
The orientation of your setup is key, and this will vary depending on its shape and size. In larger professional music studios, you want to start by facing the longer length of the room, in order to establish your listening position. Your monitors would be mounted on this length of the wall, firing sound down the shorter length of the room. An example of this is illustrated below.
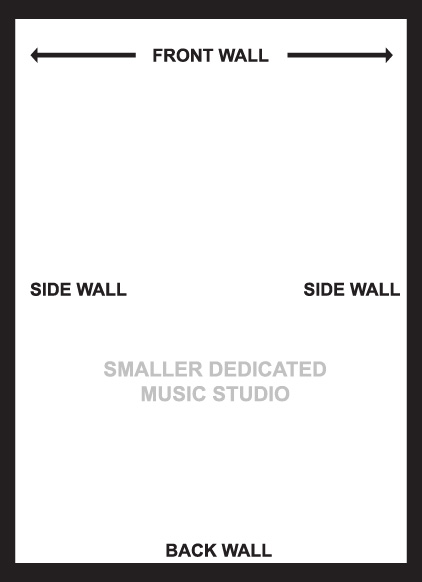
This is contrary to smaller studios in which it is ideal to face the shorter length of the room. Your monitor speakers, in this case, would fire down the longer length of the room. The issue of orientation in this regard becomes null and void in the case of a perfectly square-shaped room, as opposed to rectangular.
Now that we’ve worked things out directionally, let’s move on to the next step in the best professional setup for studio monitors.
Step 2: Creating a Flush-Mount Wall for your Monitors
As mentioned previously, high-end professional music studios typically flush-mount/soffit-mount their speakers. Studio Designers generally consider this the ideal mounting method when it comes to obtaining the best professional setup for studio monitors.
What is Flush-Mounting?
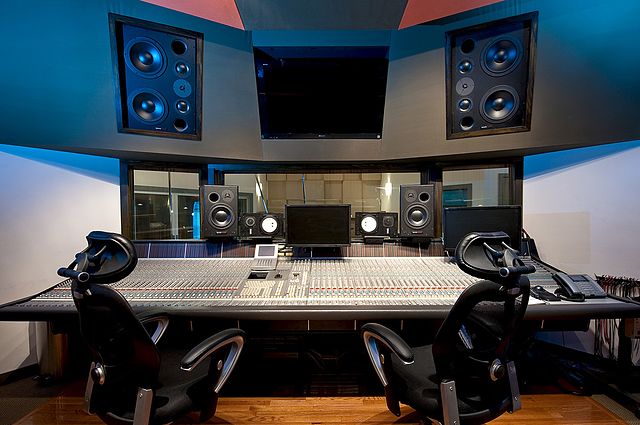
Example of Flush-Mount installed monitors
Professional studios typically make use of a monitor system set into the actual studio wall. This is what we refer to as flush-mounting your speakers. It entails the construction of a new wall (using permanent or non-permanent materials) into which the monitors are placed. This serves as a decoupling system of sorts. Essentially, the resonances emitted from the body of the monitor encasing are eliminated behind the flush-mount wall, while a more direct sound is emitted from the woofers ahead.
There are a variety of materials that can be used to create a flush mount wall, each with their own benefits:
Gypsum Board/Dry Wall
The lightest in mass of the materials discussed here. Because of this, you may need to use several layers of the board in order to adequately decouple the resonance transmission from the rest of the room. You may also combine materials in order to increase the density of the wall mass. Consider elements such as wood or acoustic paneling behind the wall. Using the drywall method is ideal if you cannot permanently install a wall into your existing room.
Wood
Wood is more advantageous to use as a method as it has the benefit of non-permanence, as well as increased density. However, wooden walls are still hollow to a degree, and so further reinforcement and addition of mass is required. To tackle the issue of susceptibility undesirable resonances, you may increase the wooden bracing as well as add some mineral wool for increased density. Your monitors would then be placed on individually built frames which would then be mounted to the wall behind. It is also suggested that you add absorption pads beneath the monitors in order to decouple them from the wood.
Concrete and Bricks
These two materials are the absolute ideal for the best professional setup for studio monitors, although they may not always be feasible. Due to their permanent nature, producers may not always be able to build these into an existing room. Heavier materials like this are considered highly suitable as they possess a high-density level. Also, in this regard, you don’t need to add additional materials behind the wall to increase its mass. The materials on their own are able to withstand additional resonance and do not emit them back into the room. You may construct a concrete wall on its own, or a brick wall, but neither require acoustic treatment behind the wall.
If the budget is tight, you could choose to use freestanding monitors as a mounting method instead. However, as we’re discussing the best professional setup for studio monitors, flush-mounting is definitely worth the planning and consideration.
Step 3: Find Your Listening Position
Your listening position determines the exact location in which you will be seated when monitoring. We’ve already established your orientation, but how far from the wall do you position yourself?
 A commonly known ‘rule’ amongst music producers and sound engineers is the 38 percent rule. This is a suggested positioning whereby the listening position is established at 38% of the length of the room. In other words, you should be positioned 38% away from the wall which you are facing.
Bear in mind
While 38% is the suggested ideal, you don’t have to strictly abide by this rule. What is important is that you avoid placing yourself at 50% lengthwise. This marks the center of the room which needs to be avoided as there is an undesirable bass null/cancellation at the center of the room. As a result, you can perhaps play around with a distance between 35-42% from the wall on which you are mounting your speakers, as a safe zone.
Step 4: Your Position in Relation to your Monitor Speakers
This is the next aspect to address when considering the best setup for your studio monitors. We now take a look at the positioning of the listener in relation to the set of monitors you’ll be using. Sound engineers/producers create an equilateral triangle between the listening position and the monitors. This is a known industry standard in terms of positioning.
 Remember that an equilateral triangle is 60º at all three corners. You’ve already marked your listening position at this stage. Mark the remaining two points on your studio wall on which your monitors will be mounted.
You also want to ensure that your overall positioning is equidistant from your the sidewalls of your room. So while your listening positioning will be approximately 38% lengthwise, it has to be centered width wise. Likewise, your speakers need to be the same distance from the wall on both the left and right-hand side.
Symmetry and balance, in this regard, is key.
Step 5: Finding the Correct Height for your Monitors
Having the ideal height for your monitor speakers is another critical step in having the best professional setup for studio monitors. The standard height for vertical monitor placement would be marked at around 47″ or 120cm from the ground.

- Flush-Mounted Monitors – For this guide, the main monitors, in particular, would be positioned at around 57-58″ (or 145-148cm) above the ground. The monitors would not be tilted, but rather, perfectly vertical in this case.
- Free Standing Monitors – Alternatively, if you are not installing flush-mounted monitors, you may take this route. Freestanding monitors that are placed perfectly upright can be situated at the recommended 120cm above the ground but no higher than 140cm.
Bear in mind that much like your listening position, avoid placing the monitors, midway vertically in the room.
Step 6: Mounting your Monitors/Adding Your Mixing Furniture
This is the final step in the best professional setup for studio monitors. After all the locating of positions and/or constructing your wall, we add the key finishing components. That is, your monitor speakers as well as your mixing desk and chair in the designated listening position.
When installing your monitors into the wall, consider adding absorption pads beneath or around the monitor in order to decouple it from the frame.
When positioning your desk and chair, remember that your seated position (the chair itself) marks the listening position.
Now that you’ve learned how to set up your environment as the pros do, get some helpful tips on how to actually make music like a pro in this article on 13 Surefire ways to Produce High-Quality Music.
For an additional guide on the best items to use for setting up a music studio, check out this article. Alternatively, check out the recommended gear page for more.